|
Converting a 1400cc K-Series Caterham to 1800cc
Between 1991
and 1996, one of Caterham's most popular engine installations was the 1400 Rover
K-series, in both "standard" and "Supersport" form. In fact in 1994, more 1400
K-Series engines were fitted to factory built cars than any other configuration.
Although a
comparatively powerful engine for it's capacity
and undoubtedly a very sweet performer in the Caterham, particularly when
coupled to Caterham's own 6-speed gearbox, the Caterham chassis is capable of
running with much more power and particularly an increase in torque over that
offered by the 1400.
Caterham
realised this, and from 1996 onwards dropped the 1400cc unit in favour of it's
bigger capacity siblings - 1600cc & 1800cc.
This has however left the 1400 a particularly good value car - after all the
1400K cars are all fuel injected and De-Dion chassis, therefore comparatively
well specified when looking at alternative derivatives. So what would be
involved in taking a 1400 K-Series Caterham, and dropping in the later 1800cc
unit to bring the car more "up to date"?
Having
owned my 1400 Caterham since 1998, in late
2002 I decided that this was the route I was going to take. The resulting task
turned out to be more straightforward than I had initially thought, and very
cost effective. Locally, there are 3 of us
with Caterhams (2 originally built as 1400 “C” Class racecars) that have
now done the conversion.
The detail....
When the Caterham was revised in 1996 to become 1600 or 1800, there
were changes made to the post 96 cars with respect to wiring, engine
management etc. Converting to post '96 wiring is
a major job, but it is possible to change a pre-96 1400 to become 1800 by
changing the mechanical bits, and "tricking" the engine management into believing
it's still running a 1400, by retaining the existing crank trigger signal
(flywheel) but using higher capacity injectors. The areas needing attention can
therefore be divided as:
Bottom End:
Rover K-Series engines share 2 common crank sizes and 2
common bore sizes enabling the 3 capacities (14/16/1800) to be achieved:
However, unfortunately the 1400 K-Series engine used by Caterham is of the
“wet-liner” type, rather than the “damp-liner” type of the 1600 & 1800
derivatives. Despite commonly being suggested, it is not possible to fit the
bigger liners of the 1600 & 1800 engines in the smaller 1400 block. The wet
liner block of the 1400 is evident by a “cross webbing” on the flat side
castings, with the liners suspended from the top face. The damp liner blocks of
the 1600 & 1800 engines have “bulges” cast in the sides that allow for the
bigger stroke of the 1800 crank – not flat sided and no cross-webbing. There are
1400K “damp-liner” engines around, but these were not standard fitment by
Caterham.
It is therefore necessary to source a complete 1800 bottom end (block, crank,
rods & pistons) to achieve the conversion to 1800cc spec.
The whole lot can be bought s/h for anything between Ł150 and whatever you’re
prepared to spend. MGF engines are a good starting point, but any 1800 K series
is fine – Freelander, Rover 200 & 400 series, Elise, etc. The VVC is
fundamentally the same bottom end as the standard K-series, but comes with a
much better flowing (and hence more valuable) head if included in the price.
Around about 2001 steel dowels were fitted to ensure better mating of the block
to head join, but any engine can have the steel dowels retro-fitted. This is
simply a case of pressing in the new dowels with a soft mallet.
(back to index)
(top of page)
Modifications to the block etc to fit the Caterham:
1. Spigot bush and bearing: Usually the spigot hole in the crank (flywheel end)
is approx 22mm diameter, but worth checking because one owner discovered the
hole to be only 10mm bore! The 22mm is the size that mates to the Rover gearbox
for the transverse engine installation. In the Caterham, the Ford gearbox is
used which has a different diameter input shaft to the Rover transverse gearbox,
and hence the need for a new spigot bearing and bush. These are available from
Caterham or
QED for approx Ł25 (together). To fit the bush it may be necessary
to clean out the 22mm hole in the crank - gently Dremmel or similar until the
bush is a tight but push fit, but use Loctite if necessary. The bush should be
gently driven in using a wooden block (or similar) until the bush is flush with
inside edge of the crank hole, effectively creating a smaller bore crank.
The spigot bearing is then pushed into the new hole (again use Loctite if
necessary) with the rubber seal outermost. During vehicle use, the bearing is
only functional when the clutch is depressed, allowing the gearbox input shaft
to rotate independently to the crank. During normal running with the crank and
input shaft rotate as one.
2. Starter motor fitment: It is necessary to grind the web from the side of the
block where the engine number is shown. A substantial amount of the end web must
be removed, and also part of the next web along which may have a threaded hole
through the middle. The amount of work to be done can easily be copied from the
old 1400 block, but if possible, remove the bellhousing from the gearbox (4
bolts on middle inside) enabling a trial run with the starter motor fitment
before trying to drop the engine back into the car! If intending to replace the
starter motor to the new underslung-solenoid type, be aware that it is necessary
to remove a greater amount of the web.
3. The engine number (copied from the rearmost web before grinding!) should be
stamped onto the top surface of the bearing ladder (level with center line of
the crank) using a 3mm letter stamping set. Examination of the old 1400 block
will show exactly where Caterham will have stamped the old number.
(back to index)
(top of page)
Top End:
All the 1400 head, cams, pulleys etc can be retained – but it should be the
later "high port" head. Older low port heads have smaller diameter ports and
hence less ability to flow – not suited to the 1800 requirements. Fundamentally
there is no difference between the later (high port) 1400 heads and the 1600 &
1800 ones - all are the same K16 head – same inlets, ports, valves etc. This is
the major reason why the power figure for the 1800 is not much greater than for
the 1400 – only approx 10 bhp difference. The 1800 is stifled somewhat by the
lack of breathing allowed by the standard head.
For lots more info refer to Dave Andrews pages on the K-Series engine:
http://members.aol.com/DVAndrews/kengine.htm
When removing the head, the whole assembly can remain intact – including the
cams. The cams are retained using a “cam carrier” which is mated to the lower
head section. These are “matched” and if for any reason need to be separated
must remain as a pair.
(back to index)
(top of page)
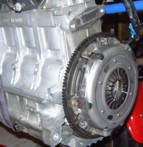
Flywheel:
All K-Series
Caterhams run "similar" flywheels, based around the Rover 1600 item (smaller
than the 1800 which will not fit in the Caterham bell housing) The only
difference with the 1400 is the "number of missing teeth" pattern that sends a
signal to the MEMS – the sensor is at the small green plug below the inlet /
plenum. The sensor uses the missing teeth pattern to send a signal to the ecu
(Rover MEMS) in order for the ecu to know the rotational position of the crank –
hence the flywheel must be matched to the MEMS unit. 1400s use the Rover-36/2
pattern (2 missing teeth) whereas 1600/1800s are the Rover-36/4 pattern. Retain
the original flywheel (or same type) and you can retain the 1400 MEMS.
Caterham have
recently been selling the lightweight flywheels for Ł100 (inc.vat), which is a
worthwhile modification. These are the same as the current 1800 version (Ł250!)
excepting the missing teeth pattern. My original flywheel had evidence of fine
cracking in the pressure surface, therefore I decided it would be better to
renew.
(back to index)
(top of page)
Injectors:
The Rover injectors are colour coded. 1400s generally have blue injectors, 1800
have "straw" (cream) ones. In order to create the fuelling needed for the 1800
engine, it is necessary to source the straw coloured injectors. Although the new
engine will be 1800cc, the MEMS will think the engine is still 1400cc. The
additional fuelling from the injectors will accommodate the increase needed for
the bigger engine. Cost of these should be approx Ł50 second-hand.
The 1400 fuel pressure regulator can be retained in the conversion rather than
using an 1800 version – it’s the black disc
shaped item at the front of the fuel-rail with a vacuum take-off. An 1800 fuel
pressure regulator gives a
slightly higher fuel rail pressure than the 1400/1600 ones - some owners who
have fitted the 1800 version have found the mixture to run too rich and have
reverted back to the original 1400 FPR.
(back to index)
(top
of page)
Clutch:
Generally it is believed that the standard clutch is fine for the 1800
conversion. However, whilst the engine is out, consideration has to be made to
fit an upgraded clutch. I understand that Caterham now use the AP comp clutch
for all models. I fitted an AP comp clutch because I knew I'd go for more power
later and I didn’t want any danger of slip. If it needs to be changed again it’s
engine out! An alternative to the AP item is a Helix clutch from
MardiGras
Motorsport,
cheaper if trying to save a little more cost. The Caterham clutch plate is a
“special” from AP with upgraded springs and can be used with a Helix or AP cover
section – totally interchangeable.
(back to index)
(top of page)
Gaskets:
Various
gaskets are needed to do the job. A head set (top end bits) and conversion set
(all others such as oil pump etc) from
DVA cost approx Ł85. The head set includes the
necessary steel dowels to replace the weak plastic ones fitted to Rover engines
until around 2001. This aids the prevention of head gasket failure.
(back to index)
(top of page)
The gearbox!
Usually a section of the gearbox input shaft needs to be removed (I did 16mm)
due to the hole in the end of a 1400 Caterham crank being bored slightly deeper
than Rover engines for other uses - Caterham now use shorter input shafts in the
gearboxes. The excess length originally just rotated in free space so it saves a
few grammes weight!!! Alternative is to have the crank bored to suit, although
this would require using a machine shop and will not be of any great benefit.
The input
shaft can be shortened using an angle grinder with a steel “cutting” disc
fitted. Put the car in gear to stop the shaft rotating and cover the surrounding
area to prevent damage from flying sparks! It should only take around 5 – 10
minutes to remove the excess.
(back to index)
(top of page)
Other points worth noting:
-
It is helpful to beg/steal/borrow 2
engine stands, enabling the units to be side by side when swapping all the bits
over. Additionally, remove the engine without the gearbox – it’s much easier!
-
Clean everything that comes
out with a toothbrush and WD40 or carb-cleaner – it’ll be like new!
-
Identify
all the main points where the engine loom must be disconnected to remove the
engine, using a coloured cable-tie. It’ll make subsequent removal really
quick if needed.
That's it -
and could probably be done by most practically minded owners.
I started by
talking to
Dave Andrews,
and ended up buying an engine from him. He guided me through a rebuild - stripping,
re-ringing, new bearings etc. Dave is an amazing engine builder - it's worth doing the
rebuild just for the "race engine building experience" he puts you through. Cost
me a little more in the end but I was pleased that I'd effectively got a "new"
engine.
Somewhere along the line I caught upgraditis, and have since fitted throttle
bodies and an Emerald ecu. Once converted to 1800, there's loads of s/h
bits available that otherwise would have been no use on a 1400. Another benefit
of the Emerald is that it’s possible to retro fit a Rover 5AS immobilser unit
complete with “plippers” – a useful upgrade if there isn’t an immobilser fitted.
And finally …….
-
One owner has had oil aeration/starvation
issues. This appears to be related to fitment of a new pump, flowed to give
better capacity and pressure, but with the downside that the ability to get
the oil to the top of the engine has increased, with no improvement in
getting it back to the sump (gravity!). The result is a
very low running level in the sump. Trials using a slightly shorter pressure
release spring have solved the problem, reducing the hot running pressure of
the engine slightly. The engine is currently running at
approximately 3.6 bar hot, compared to a previous 4.0 bar.
(top of page)
Important Disclaimer:
All information given herewith
is given in good faith and is a statement of facts believed by the author to be
accurate at the time of writing. Use of the information directly or indirectly
is at the users own risk.
|